Archive for the ‘starters’ Category

h1

A sucker for octopus

November 26, 2013

photo 4For ages I’ve wanted to try cooking Big Octopus, as opposed to the baby version which has always seemed much more approachable. But over the last while, a few thick slices of pickled or marinated or grilled but always sweetly tender occy in tapas or salads at cool places like Movida and Bar Lourinha in Melbourne and our beloved local Harts Yard in Sydney have given me a taste for tentacles.

So I decided last night to have a crack at a grilled octopus salad. Off to the fish market where I bypassed the baby and medium octopi for the big mamas, and bought a single octopus which weighed a bit over a kilo (our fishmonger removes the head and the beak – if yours doesn’t, you’ll need to do it yourself). After a little research I decided to take a punt with a mix of this and this recipe.

photo 1[1]There’s a lot of advice around about how to cook octopus, but most agree that for tender tentacles, it’s essential to boil or simmer it first. Some folks boil up a big batch and then freeze it (another step in the tenderising process, apparently) so all that’s required is thawing and grilling. I like that idea and might try it in future. I didn’t bother with all the other  recommendations like putting a cork in the water (something to do with tartaric acid) or bashing the crap out of the creature on the back patio first to tenderise it.
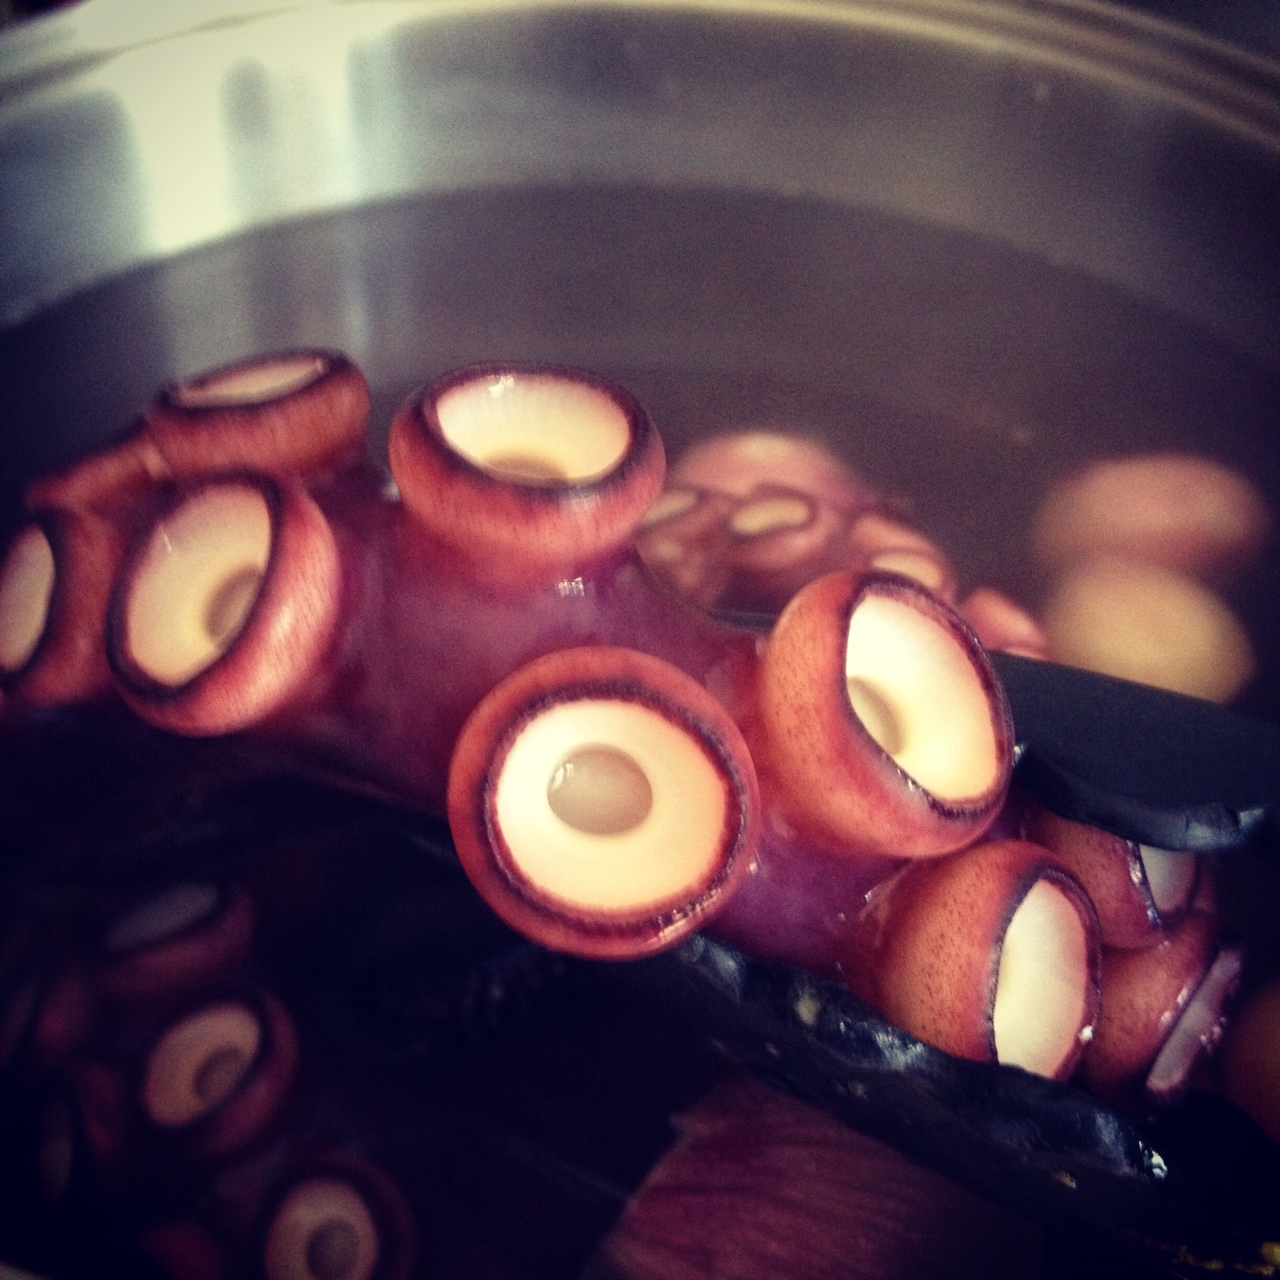
photo 2[1]Instead I just brought a big pot of salted water to boil, threw in some eschallots and a few fresh bay leaves, and then dunked the creature into the deep three times. I have absolutely no idea why this is a good idea, but lots of people recommend it. This explains the blurriness of these pictures – it’s quite hard to wrangle a dripping kilo of octopus in tongs in one hand while photographing with the other! Then I dropped it back in, admiring those stunning suckers all the while, covered it with some baking paper (again, not sure of the rationale but I’m an obedient lass) and brought it back to the boil, then turned down to simmer for around 45 minutes.

photo 2
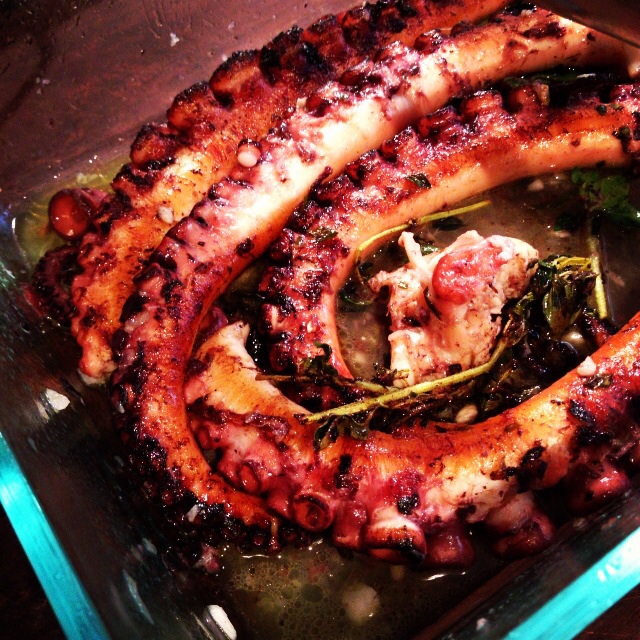
When it felt tender when pierced with a skewer, I drained and cooled it under running water, whereupon quite a bit of soft purple skin came away. After that I cut the ‘wheel’ in half and laid the now-soft and still slightly warm tentacles in a glass dish with lots of olive oil, several long sprigs of fresh oregano from the garden, a chopped clove of garlic (received our annual five kilos of Patrice Newell garlic the other day, yippee) and the juice of one lemon. Squidged it all together with clean hands, covered it and bunged it into the fridge for a few hours. Advice for marinating recommends anything from half an hour to overnight, so take your pick. Mine ended up being in there for around five hours.

Then I returned to the desk for an afternoon’s work – back to the novel in progress (and an exciting online project I’m working on with psychologist and coach Alison Manning about managing the emotional ups and downs of the creative life – artists and writers, stay tuned! 

imageOf course it began raining just when I wanted to use the barbecue, so instead I tossed the tentacles in a hot non-stick pan in two batches, cooking for two minutes each side to get that nice lemony golden crust. Then threw them back in the marinade while I fried a few sliced of haloumi for a minute or so each side.

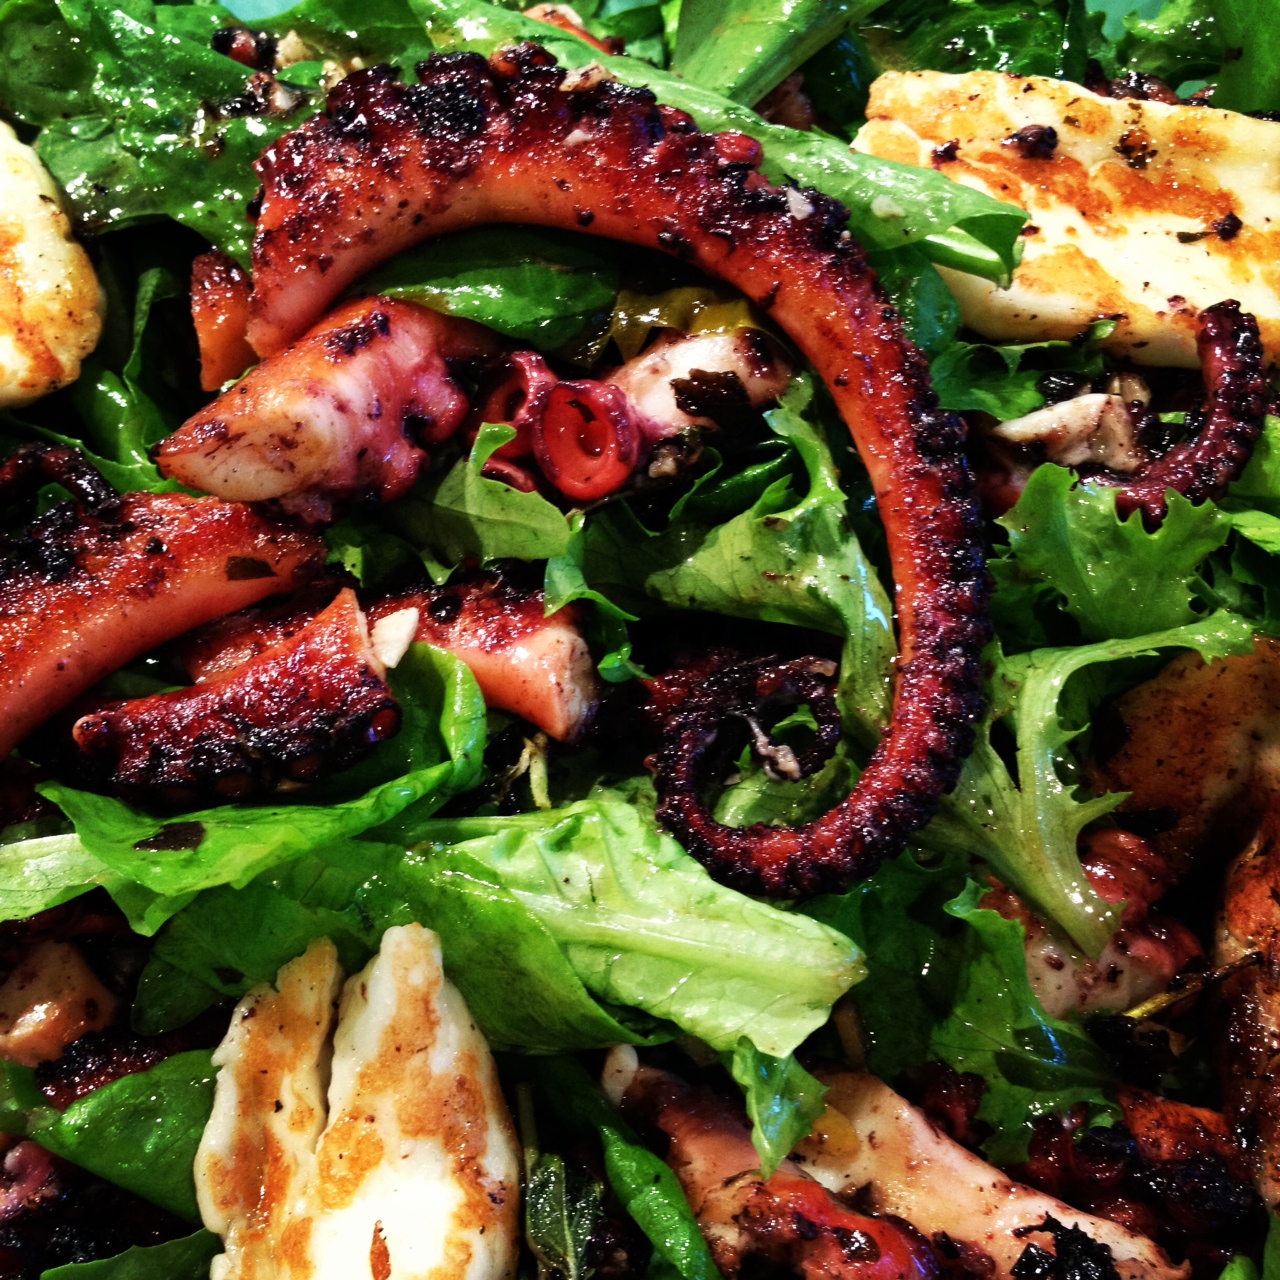
I sliced the tentacles into a few pieces and then chucked the lot into a pile of fresh lettuce leaves (growing lettuce in pots is one of the joys of summer, so easy and soooo much better than bought stuff) with a dressing of balsamic vinegar, olive oil and some chopped preserved lemon.

The result was just about perfect – crisp outside, tender inside and not even faintly rubbery. This would be a lovely lightish yet still substantial entree for four people – but because we are greedy we ate the lot for dinner between two.

Now I’ve mastered the art of tender tentacles I’m going to experiment with lots more uses – tapas, canapés, braises and pickles. Could be the dish of the summer –  if this scarily intelligent species doesn’t rise up and take over our world first, that is…

h1

Feeling a little crabby?

December 6, 2010

In which practice actually does make perfect

Flicking through the recipe books in search of something special for a friend’s birthday dinner the other week, I happened upon Damien Pignolet’s crab soufflé. But I soon grew daunted by the gazillion steps, and then breathed a big sigh of relief when I remembered one of our guests can’t eat gluten, as the soufflé had flour in it. Then another idea struck: crab mousse! Retro enough to be surprising – or possibly raise a laugh – but I figured it would also involve just enough velvety lusciousness and feel-the-love effort to make a birthday girl feel special.

Next step, hello internets. My friends, there are so many bad recipes online, have you noticed? Obviously there are squillions of brilliant ones too (*bats eyelashes*), but lordy me. Google ‘crab mousse’ and you will find yourself immersed in more lists of cream cheese, powdered onion soup, gelatine, emulsifiers and other icky goop than you can poke a whisk  at.

Happy was I, then, to find this baked crab mousse recipe from  Tamasin Day-Lewis. But never having baked such a thing as mousse before I decided, most uncharacteristically, to give it a practice whirl a few days before the birthday do. Usually I don’t bother practising, being blessed with forgiving friends who are usually happy to be experimented upon and whose manners are impeccable even when served less-than-fabulous meals (Ms A, I’m thinking particularly of you and the grass-clippings chicken a short while ago – you were a model of composure).

Anyhoo – in this instance practice was a good idea. The first time I made the recipe I kept the oven at its standard fan setting, but it was too hot. I also used the recipe’s method of covering each mousse with greaseproof paper but that was a total dud idea for us, as the paper simply curled up, and given the hot oven the thing began to brown round the edges, which is not what you want on a delicate, pale, crabby moussy thing like this. Also, served after five minutes as recommended was way too hot. And finally, presentation-wise it tended to look a little wan and needed a bit of bling. However, the texture was not bad and the flavour was good. So good. So very good.

On the second attempt – birthday dinner day – everything went swimmingly. I used foil to completely cover the ramekins instead of the paper; I turned the fan function off on the oven; I cooked the mousse a little longer and let them cool for longer in the pots. And as a garnish I added a blob of creme fraiche with torn dill and a teeny dollop of caviar. And I am here to tell you it was good. The birthday girl loved it and so did we.

Baked crab mousse with dill & caviar

Adapted from Tamasin’s Great British Classics

Serves 6

Ingredients

  • meat picked from body & claws of 4 cooked blue swimmer crabs, or about 250g crab meat
  • 4 eggs, beaten
  • 400ml thickened cream
  • 4 tsp dry sherry
  • 2 tsp Dijon mustard
  • biggish pinch cayenne pepper (be careful – taste at half a pinch first)
  • 2 tbsp finely grated Parmesan
  • 6 dollops of creme fraiche
  • a few fronds of dill
  • caviar or salmon pearls
  • salt & pepper

Method

1. Preheat the oven to 170C. If you have an adjustable fan setting, turn it off or to lowest setting.

2. Lightly grease 6 small ramekins.

2. Puree crab meat, eggs, cream, pepper, mustard and sherry until smooth.

3. Stir in the Parmesan and season to taste.

4. Spoon the mixture into the prepared ramekins and cover each with a round of aluminium foil.

5. Sit the ramekins in a roasting pan and pour enough near-boiling water into it to come halfway up the sides of the ramekins.

6. Bake for 25 minutes and check. If they are still very wobbly in the centre, keep cooking for another five or ten minutes. The centre should be just lightly set.

7. Remove pan from oven and leave on the stove top, leaving ramekins covered in the water bath until ready to serve. I left them sitting for a little over an hour, and the temperature was perfect – just slightly warm is the perfect temperature.

8. Remove foil lids, wipe away any condensation from the rims and top each one with a dollop of creme fraiche, a tiny spoonful of salmon pearls or caviar and a teensy frond of dill.

9. Serve with champagne & teaspoons.

In this case, practice made (almost) perfect, and I’m glad I did the test run. I doubt I’ll take up testing recipes first on a regular basis – who can be bothered? – but would love to know if you do. Are you a routine practiser or do you use your friends as guinea pigs? Any fabulous disaster stories? Do tell.


h1

Smoke on the water

August 15, 2010

Tea smoked salmon salad with crisp pancetta & horseradish cream

I was recently reminded about the earthy beauty of tea-smoked fish by that television show. You can see the MasterChef video here – well worth watching to see the technique working easily. Thank God MasterChef is over, is all I can say, because now I have my life back.  I feel as though I was in a cult for a while there (much like my favourite Twitter MC commentator, Ben Pobjie – read about his amusing MC addiction here).

Years ago I used to make a rather complicated but luscious Neil Perry tea smoked ocean trout with spring onion cake from the Rockpool book, and had forgotten all about it until watching the telly reminded me that the complicated aspects of that recipe were the sauce and other  bits, but that the smoking itself was really quite simple.

So, during a couple of beachside weekends with friends last fortnight (lucky us, no?) I decided to give tea smoking another go, minus the difficult stuff. Tea-smoking can be a tiny bit time-consuming, but the rich, complex flavour is well worth it. The first time we did the smoking using a wok and a barbecue; the second time, we borrowed the Empress‘s proper smoking box.  The latter was much quicker but because the smokiness was more intense we finished cooking the fillets with a few minutes in a moderate oven to prevent it tasting more like an ashtray than salmon. The first – if you do it right – is easy and doesn’t require special gear.

The smoking mixture

The MasterChef chaps used hickory chips combined with the smoking mixture, and so did I – but my original version of Neil Perry’s one only used the tea, rice and sugar, and except for the fact we now have a sizable bag of the chips (available from barbecue shops) I wouldn’t bother with the woody stuff again.

Most recipes I’ve seen for smoking are the same – equal parts (say, a cup of each) jasmine rice, jasmine tea and brown sugar.  You can see the mix with the chips pictured here – you just toss them all together and mix. The first time, using the wok, I thought it would be neat to use an alumnium tray to hold the mixture, but this turned out to be a tres stupid idea, because it took forever for the mix to get hot enough. Next time, I would do as everyone advises, and simply put the mix in some foil directly on the base of the wok. Simple stuff – you need maximum contact between the mix and the heat. Duh.

__________________________________________________________________________________________________________________________________________________

Next, get the fish on a wire rack. The video advises putting the fish on baking paper first, which we did the first time, but didn’t bother the second time. Again, I think best is maximum circulation of the smoke and our quantity of fish meant the paper worked as another barrier between the heat & smoke and the fish. So on our second attempt I simply oiled the rack to ensure non-sticking, which worked fine.

The advantage of the wok method is that you can fit lots of fish in there at once. Then you put the wok on the barbecue, and put a lid on to ensure the smoke stays inside. Problem number three for our first attempt was that I have no wok lid, so used a metal bowl instead. I think if I’d had the mix directly on the foil & base of wok instead of the tray this wouldn’t have been a big issue, but it would be better to have a tighter fit between the lid and the wok so the smoke stays within the space as much as possible. As it was, we improvised a little tin-foil pashmina to wrap around the whole thing where ‘lid’ met wok, which did help a great deal to keep the smoke inside.

Which brings us to the great advantage of the smoker box – the seal, made by a sliding lid,  is very tight and the tray is very close to the mix itself.  Slight drawback for us, in cooking for ten, was that we had to do two batches. But then again, that allowed a couple of different levels of smokiness which allowed people to choose which flavour they liked best from the platter.

In retrospect I think you are supposed to get the thing smoking before putting the fish in, but both times we started with the fish in place, which seemed fine. The fish was beautifully moist both times, so I don’t think there’s much danger of overcooking.

The heat source on the smoking box is a sweet little pot of methlated spirits which sits beneath and outside the box and puts out a surprisingly powerful flame. With the wok, we just used the barbecue. You could easily use your stovetop as they do in the video, but the smoky smell might be difficult to get out of any nearby soft furnishings so I’d advise doing this outside if you can.

___________________________________________________________________________________________________________________________________________________

Here is the smoked fish after about eight minutes in the smoking box – highly smoked on the outside, but a couple of pieces were quite raw beneath the exterior. Another five minutes or so in the oven fixed that, but several pieces were just cooked through enough to leave as they were.

With the wok smoking (when it finally got going, about half an hour after starting – but as discussed, this delay should be prevented by foil-cup-direct-to-wok-surface method), the smoking was subtler but the cooking more even. You should see white droplets reaching the exterior as it begins to cook within.

_________________________________________________________________________________________________________________

So, once your salmon – or trout, or ocean trout or I imagine even chicken or whatever else you fancy! – is ready, all you need to make this salad is some good springy green leaves, some crisped bacon, pancetta or proscuitto, and a creamy dressing we made this time with creme fraiche, fresh horseradish and finely chopped dill, salt & pepper. A mix of good Greek-style yoghurt, dill and horseradish cream would do just as well. I dressed the leaves first in my standard three-parts-oil-one-part-balsamic vinegar dressing, then over that arranged the chunks of salmon, then topped with the bacon and a few dollops of the creamy dressing (keep the rest in a jug on the side – believe me, it’ll go).

All that remained was to pour a glass of bubbles, sling the platter into the centre of the table and then admire the ocean view before hogging into this for lunch.

I am now in love with the whole idea of hot-smoked fish, and am ready to play around with the flavours, with different fish, different teas and so on. Have any of you ever done this? Tempted to give it a try? I can seriously recommend the flavour – it’s so delicately musky – but also the flesh stays so satiny and moist, the texture is just as good a reason to do it. If you do give it a try, please come back and tell me how you go!

h1

The Vine Intervention, pt 1

February 19, 2010

Till now, my appreciation of Vitis vinifera has been limited to a lifelong (and let’s admit it, rather passionate) love affair with the grape. I’ve admired the leaves from afar – on the plant – but cooking with them has never appealed. I know everybody loves dolmades, for example, but their vineleaf wrapping has always been way too slimy for my liking. Frankly I’ve found eating dolmades too often to feel like popping a big fat slug in the mouth. So the idea of using those vine leaves packed in oil – ugh.

But joy of joys, these reservations are in the past, because this week I have discovered the joy of cooking with fresh vine leaves, and there ain’t no turning back. I love them. And now I’m plotting to somehow grow a vine here, for our own supply.

This new affair began when Mr & Ms Melba offered me some leaves from their gorgeously lush and laden vine, and mentioned a turkish vine leaf ‘pie’ Ms M had made. I had to check that out. And then the stars aligned, with Karen Martini’s incredible looking vine leaf recipes in last week’s Sun Herald.  Both these dishes are the business. I urge you to pluck a big handful of leaves next time you are in the vicinity of a vine, and try them. One other great thing about the leaves is, as I discovered by leaving a sealed plastic bag full of them in the fridge and then forgetting them for a whole two weeks, that they keep incredibly well. When I opened the bag it was as if they were picked minutes before. Amazing.

This post I’ll share the Karen Martini recipe, which I now understand is a variation on a traditional Greek dish (JMo, if you’re out there, can you confirm?), but was a revelation to me.  Next time, the pie.

Now the recipe below used packaged vine leaves, but was perfect with fresh. The only preparation I did was soak the leaves in boiling water for 10 minutes, then drain and press dry in a tea towel, and cut out the hard stalk. We used nectarines in place of peach and it was delicious. Having never heard of saba, I used vin cotto as suggested. Di-vine.

Karen Martini’s vine-leaf wrapped haloumi with peach

1 large bulb garlic

olive oil

1 packet haloumi cheese, sliced into 8 pieces

8 vine leaves (rinsed, if packet, or fresh prepared as above)

2 ripe peaches (or nectarines), cut into wedges

1/2 lemon, juiced

3 tbsp saba, a grape must reduction (or vin cotto, or balsamic vinegar)

1. Cut the top off the garlic bulb, drizzle with oil, wrap in foil and roast in a moderate oven for 40 minutes or till soft. Allow to cool.

2. Smear each haloumi slice with the roasted garlic, then wrap tightly in a vine leaf.

3.  Heat 80ml olive oil in a non-stick frying pan over medium heat and cook haloumi for 1 minute each side, till the cheese starts to melt, but not burning the leaf.

4. Arrange on a plate, scatter with the nectarine or peach and drizzle with the lemon juice and vin cotto / saba .

h1

Getting figgy with it

January 25, 2010

About mid January each year I start stalking the grocery shelves for figs.

I’m not sure what it is about figs that just gets my blood fizzling – the textural feast, perhaps? The soft, creamy interior with that slightly powdery skin? Or maybe it’s just that I pretty much always eat them with prosciutto, and that ol sweet/salty flavour bomb is simply irresistible. And then there’s the absence-makes-the-heart-grow-fonder factor; with such a relatively short season, their arrival is cause for celebration and one is simply obliged to make a fig festival of the fact each year.

On Saturday I saw the first display in our grocer’s – of local figs that is, not Californians which have been there for a while, priced at something like four bucks each – and so of course I pounced on a big punnet of squat, heavy little beauties. That evening, before we had a chance to eat them, we went to dinner at our friends Mr & Ms Lilyfields’, and were served a fig salad so delicious that I was compelled to try to replicate it immediately the next day.

Ms Lilyfield used the classic combo of prosciutto, soft cheese & figs (I’ve used gorgonzola and other blue cheeses before – and oh, my it’s good) but she chose that amazing Persian feta, to which she added the lovely, slightly bitter, sharpness of radicchio. The finishing touch was a drizzle of luscious caramelised balsamic vinegar.

As I say, we loved it so much we tried a similar thing ourselves the next evening, and it was fantastic. So here’s my made-up copycat version. You gotta be careful not to overdo the sweetness in this, specially with the dressing. You can buy caramelised balsamic (I was given some of this last year and it is gorgeous stuff), but it’s also very simple to make. Oh and I reckon this salad would be incredible with labneh too; that’s my next plan.

Ms Lily’s luscious
fig salad with caramelised
balsamic dressing

– 1 punnet fresh figs

– 4-5 slices prosciutto, torn

– radicchio leaves

– basil leaves

– marinated feta cubes

– ¼ cup balsamic vinegar

– 1-2 tablespoons brown sugar (depending on how sweet you want it)

  1. Cut figs into halves or quarters and brush with a teeny bit of olive oil.
  2. Grill these on a tray with the prosciutto for a few minutes until the figs are warmed & the prosciutto crisp.
  3. Meanwhile, simmer the balsamic vinegar and sugar in the smallest pan you have, and gently reduce it till it’s thick and syrupy.
  4. Arrange the radicchio leaves in a bowl (or, more glamorously, on separate plates for each person) and drizzle with good olive oil.
  5. Top with the figs, prosciutto and add as much feta as you like – about three tablespoons is probably plenty.
  6. Gently mix these and the leaves together with your hands, add the basil and drizzle the lot with the balsamic syrup and season.
  7. Stand by for groans of delight.

Of course there are lots of other things to do with figs, including just popping one in your mouth for the pleasure explosion – I’m keen to hear your faves. Any fig festival contributions to share?

h1

Loaves and fishes: my list of miracle foods

December 15, 2009

Okay, I know Christmas isn’t strictly related to that particular miracle (reminds me of the time my heathen brother-in-law demanded of my mother what the hell Easter eggs had to do with Jesus being born in Bethlehem anyway…), but one of the things I really like Christmas & New Year holidays is the tendency toward spontaneous and sprawly gatherings over food.

You know the kind of thing, two people for lunch turns into ten, and an instant party ensues. But to make that kind of thing fun it’s gotta be stress free – so here’s my list of good stuff you can pull out at the last second for lunch or picknicky dinner, or take to a friend’s place to blast off their Christmas stress.

Some are old summer holiday faves, and some gleaned from these pages this year. Most of this stuff can be bought in advance and shoved in the fridge, freezer or pantry to pull our for miracle-working when requried…

  • Oysters – of course! Buy them unopened a few days before Christmas and keep in a bucket with a wet towel over them in a cool place – they keep for a couple of weeks.
  • Glazed ham – leftovers, for weeks. Mmmmm.
  • Chutneys & pickles – years ago the Empress introduced me to the killer recipe for Christine Manfield’s eggplant pickle.
  • Smoked salmon – or Virginia & Nigella’s cured salmon! – w creme fraiche and/or salmon roe & sourdough
  • Smoked trout –  keep a couple in the freezer and pull them out any old time
  • Cooked prawns, green salad, mayonnaise
  • Bread – keep a supply of sourdough in the freezer
  • Green salad, nicely dressed with good oil & vinegar
  • Chickpeas – of course! Chuck em in a bowl with bottled roasted capsicum & marinated feta or labneh, or try these ideas
  • Baba ganoush & Steph’s beetroot dip – plus packets and packets of rice crackers
  • Quinoa salad or citrus couscous (make a huge batch – both of these keep forever)
  • Lots of luscious, ripe avocado – buy a heap of those rock hard ones now to have softies on hand for later.
  • Lots and lots and lots of ripe tomatoes
  • Devils on horseback – everybody loves them! And you can keep sealed pancetta & pitted prunes on hand for months…
  • A couple of fillets of salmon in the freezer and a couple of spuds can yield a heap of salmon patties for a crowd.
  • Peas! I am never without a huge bag of frozen peas in the freezer. Actually there will be a new post on peas coming shortly…
  • Eggs – chuck a few halved, hard-boiled eggs in a green salad with some chunks of fresh, cured or smoked salmon and you have a delicious twist on nicoise.
  • Labneh – mmmm.
  • Quiche – if you have frozen shortcrust pastry in the freezer, a quiche takes about fifteen minutes to throw together and another twenty to cook. Fast and fab.

Okeydokes, that’s Santa’s (or Jesus’s?) list of magic expandable food for now – but you must have lots of things to add …

*Oh, and today’s Christmas Excess Antidote is courtesy of www.kiva.org– I absolutely love this site. At the click of a mouse you can provide a micro-loan (as little as $25) to someone in a developing country who’s making a go of things with very slim pickings indeed. I love it so much because your loan just keeps on giving – you can either get the money back (though what kind of a person …) or choose that it goes to someone else in the chain. Perfect!

h1

Leaves of class

December 1, 2009

This will be a short post. I just wanted to show off the salad leaves grown in our garden. If I could only grow one thing, salad leaves would be it. These days it’s not hard to find beautiful tomatoes (in season), good herbs and so on; but there is absolutely nothing like the texture of salad leaves eaten within half an hour of picking – they are satiny, springy, silky and full of fresh flavour. Truly. Do it.

We have the little lettuces and clumps of sorrel and leafy whatnots sprinkled about the garden (and when I say ‘garden’ I mean 4m x 5m paved courtyard!)  in among the other plants, and around the base of some small trees in pots. All they need is a good bit of sun and decent watering and a feed of seaweed stuff & worm juice now and then and they go ballistic. (Jamie, any other growing hints?)

To harvest, we use the cut-and-come-again method, just snipping off the outside leaves as needed, and gathering a mixture of different types of lettuce, some Asian salad greens, a bit of cress, some tiny beetroot leaves and a few herb leaves (basil, mint) each time. There are weeks when there’s nothing to take, of course, and then there is the time of plenty – best to stagger the plantings and plant new seedlings every three or four weeks.

As soon as the lettuces start to go to seed – when they grow tall and gangly – the leaves begin to turn bitter, and I think that inadequate watering makes them bolt faster, so keep the water up and keep nibbling away at the outer leaves to get the best crop.

Once I pick them as close to eating as possible, I stick them in this mini-sinkful of cold water for a good 10 minutes or so (ice cubes in the water if it’s a really hot day) and then spin them in the salad spinner (another girl’s best friend in the kitchen) to dry as much as possible, before either eating or tossing into a zip-seal plastic bag with plenty of air in it in the fridge.

To me, the perfect salad dressing is 3 parts best olive oil to 1 part best balsamic vinegar, plenty of salt and pepper. But other friends make gorgeous dressings, especially my friend E, whose dressings I think always include raspberry vinegar. E, if you’re out there, can you provide your secret? And the Empress is a fan of a little walnut oil in her dressing, I believe? And what about the rest of you; what makes your green salad spin?

h1

A new leaf – my miang goong

November 25, 2009

As I passed the excellent Fiji Market in King St, Newtown today (on the way home from the gym, that was – insert praise here), I remembered that’s where I’d seen the betel leaves used to make miang  kham, those little roll-up-and-stick-in-your-gob piles of Thai spicy goodness. So I popped in and snagged myself a pack of these fresh green heart-shaped lovelies (about 10 or 12 leaves for $2.50).

I have many times enjoyed the delectable Miang Goong at Thai Pothong described here but never attempted it myself till this evening. And I have to say, this is one of the zingiest new things I’ve tried in a long time. Tested these little babies not only on Senor but his two Wednesday piano students, adventurous primary-school gourmands Lulu and Riley and their caterer dad, and it got the thumbs up from all.

A quick Google search came up with a few recipes for Miang Khang (that’s without the goong – the prawns) and I chose this one to adapt.

The fiddly bit is the sauce – but I doubled the quantity of this one and had masses left over, now safely in the freezer for easy peasy quick Miang assembly for the next time or two.

My adaptation is here, but there must be lots of proper recipes about the place – I urge you to make this, because even though the sauce is fiddly, it’s much easier than you might think and very very good. Read the rest of this entry ?